

An anodizing order usually starts with a colour and a part, and that is where the problems begin. The coating is an oxide layer grown from the aluminium itself, so the alloy, the temper, the surface before processing and the class of coating all change the result. Two parts machined to the same drawing can come back a shade apart because one was made from a different alloy, and a thread can fail to engage because nobody accounted for the coating growing on it. This guide covers what anodizing changes, how to call out Type II and Type III correctly, and what belongs on the drawing before the parts are shipped.
Should the drawing specify Type II or Type III?
Type II for appearance and protection, Type III for wear.
Both grow an oxide layer from the aluminium surface, and the difference is the thickness and hardness of that layer, which changes both the wear resistance and the dimensional effect.
The types are defined in the governing specification, MIL-PRF-8625, which sets out the coating classes and their thickness requirements along with the test methods that verify them. Type II is the sulfuric acid process used for the majority of cosmetic and general engineering parts: it produces a clear or dyed finish with moderate wear resistance. Type III, often called hard anodizing, produces a thicker, harder layer intended for sliding contact, abrasive environments and parts that must resist wear.
The choice follows the function rather than the appearance. Where the part is a visible housing or a bracket that should not corrode, Type II in a colour of choice is the usual answer. Where the surface will be rubbed, slid against another component, or used as a wear face, Type III is specified and the dimensional consequences are planned for.
Both types can be dyed, and both can be sealed. The sealing step closes the pores that make the coating receptive to dye, and it also affects corrosion performance and colour stability, so it belongs in the specification rather than being left to the finisher’s default.
What does anodizing actually change on the surface?
It converts aluminium into aluminium oxide, in place.
The coating is not applied on top of the metal: roughly half the layer grows outward and half penetrates inward, which is why dimensions change and why surface defects become more visible.
Because the coating is grown from the substrate, it inherits the substrate’s condition. Machining marks, scratches and handling damage that were barely visible on bare aluminium become more pronounced after anodizing, because the coating follows the surface it grew from and because a glossy or dyed finish amplifies contrast. That is why the surface preparation requirement belongs in the request: a part destined for a cosmetic anodized finish should be inspected before it goes to the finishing line, not after.
The in-place growth also means the coating has no distinct interface to chip from, which is one of its advantages over paint. It does not flake or peel the way an applied coating can, and its colour is integral rather than a film. What it cannot do is hide surface defects, and it cannot be repaired locally: a damaged area is a rework rather than a touch-up.
Corrosion performance and wear resistance both follow from the oxide layer and from the sealing step. Sealing closes the pores and improves resistance to staining and corrosion; unsealed coatings are used where dye absorption or a specific subsequent process requires open pores, but they are more sensitive to contamination. The alloys available for anodized parts are documented on the aluminium material page, and the manufacturing quality framework that supports finishing qualification is described by NIST MEP.
How does coating growth affect dimensions and threads?
It grows into and out of the surface, so fits tighten.
Coating growth adds material to the outside of the part, which closes bores, reduces clearances and interferes with threads unless masking or an allowance is specified.
The dimensional effect is the most common source of rework on anodized parts, and it is entirely predictable. An external surface grows by the outward part of the coating, so a shaft becomes slightly larger. An internal feature such as a bore or a tapped hole effectively shrinks, because the coating grows inward from the walls. Mating parts that were dimensioned without an allowance end up too tight.
Three responses cover most cases. The first is to leave an allowance on the drawing, dimensioning the machined part so that the coated part lands on nominal. The second is to mask the features that must remain bare, which protects threads, electrical contact points and close-tolerance bores. The third is to machine after coating, which is used where the interface is critical enough that the coating must be removed to reach tolerance.
Masking is the most common solution and the one most often left out of the request. Threads are the classic example: a tapped hole that is anodized will not accept its fastener cleanly, and the fix is either to mask the thread or to tap it after coating. Whichever approach is chosen, it has to be agreed before the parts are processed. The dimensional framework behind those callouts is set out on 6CProto’s standards and tolerances page.
| Factor | Type II (sulfuric) | Type III (hard) |
|---|---|---|
| Primary purpose | Appearance and general corrosion protection | Wear resistance and abrasion |
| Relative thickness | Thinner, as defined by the class | Thicker, as defined by the class |
| Dimensional effect | Small but real; still needs allowance | Larger; allowance is essential |
| Colour options | Wide range of dyes | More limited; darker tones are common |
| Typical parts | Housings, brackets, visible panels | Sliding faces, pistons, wear surfaces |
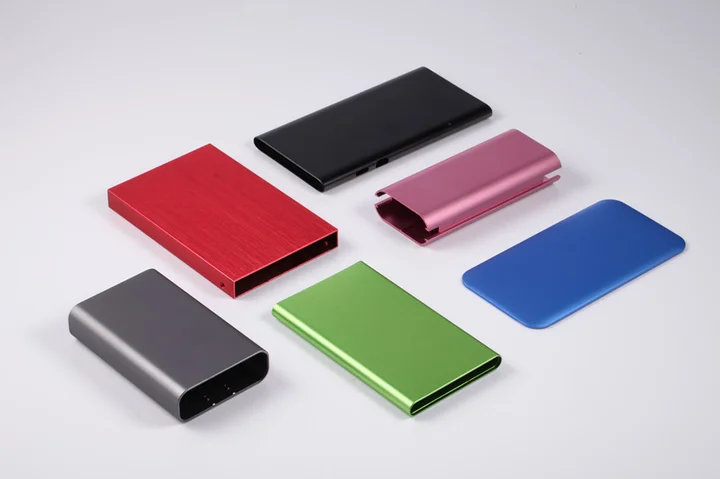
How do colour, dyeing and sealing work?
Dye enters the pores, and sealing closes them.
The anodic layer is porous when it forms, which is what allows dye to penetrate, and the sealing step then closes the pores and locks the colour into the oxide.
Colour in anodizing is not paint. The dye is absorbed into the porous structure of the coating and then sealed in place, which is why it does not chip and why it can be affected by the coating’s thickness and porosity. Clear anodizing without dye is also common, and its appearance depends on the alloy: some alloys produce a warm tint, others a cooler grey, and castings often show a mottled appearance because of their internal structure.
Sealing choices affect both appearance and performance. Sealing improves corrosion resistance and reduces the tendency of the dye to bleed or fade, and it can also influence the final sheen. Where a part has to be handled repeatedly during assembly, sealing also makes the surface less prone to staining from skin contact.
What the process cannot do is guarantee an exact colour match across dissimilar alloys or across parts of different thickness. Colour acceptance is a judgement, and the practical way to manage it is to approve a reference part or a colour sample before the production batch runs, then treat that reference as the standard for subsequent orders. The routes available are described in the surface finish guides.
How does alloy choice affect the result?
Substantially, and before the finishing shop sees the part.
Wrought alloys such as the 6000 series anodize evenly and take dye predictably, while high-copper alloys and castings produce different colour and surface results.
The 6000 series alloys are the common choice for anodized parts because they produce a uniform coating and accept dye consistently, which is why they are specified for visible components. Alloys with higher copper or zinc content, including some of the 7000 series, produce coatings that behave differently: colour can shift, dye absorption varies, and in some cases the resulting coating is less uniform. Cast aluminium is a different case again, with porosity and a coarser microstructure that produce a mottled appearance even when the coating itself is sound.
Temper and heat treatment matter too. The same alloy in different tempers can show slightly different colour after anodizing, which becomes visible when parts from two batches are assembled into one product. Where colour consistency matters across a program, the alloy and temper belong in the specification, not just the part number.
Where a program requires both strength and anodizing, the practical answer is often to machine from a suitable wrought alloy and design around the alloy’s properties, rather than to select a high-strength grade and accept the finishing consequences. The corrosion and coating context behind those choices is published by the ASTM committee B08 on metallic and inorganic coatings, and the materials engineering context by ASM International.
What drives cost and lead time?
Quantity, handling, masking and colour.
Anodizing prices are dominated by labour rather than chemistry: parts are racked, processed and inspected individually, so handling and masking determine much of the cost.
Racking is the first factor. Every part must be held on a rack that makes electrical contact, which leaves a small uncoated area wherever the contact sits. The racking layout determines how many parts fit in the tank and where the contact marks appear, so the position of those marks is worth agreeing in advance on cosmetic parts.
Masking is the second and often the largest labour item. Each masked feature has to be plugged, taped or lacquered by hand and removed afterwards, so a part with many protected holes costs more to process than the same part with none. Where a design allows a thread or a bore to be managed by an allowance instead of masking, the labour disappears.
Colour and finish requirements come third. Standard dyes process in batches; special colours may need a dedicated run, which carries a minimum quantity or a setup charge. Cosmetic inspection requirements add time as well, particularly where parts must be individually assessed against a reference.
The practical effect is that anodizing rewards designs that think about processing early. Consolidating protected features, accepting an allowance rather than masking where possible, and choosing the alloy with the finish in mind all reduce cost without changing the part’s function. Requests submitted through the quote flow receive a review, so masking and racking questions can be resolved before the parts are made. Waste from the anodizing line, including spent chemistry and rinse water, is handled under the industrial framework published by the US Environmental Protection Agency.
What should be inspected, and how?
Colour against a reference, thickness, and the fits.
A useful acceptance check covers appearance against an approved sample, coating thickness measured on the part, and verification that protected features remain functional.
Appearance is best judged against a physical reference under a defined viewing condition, because colour descriptions do not survive translation between two people. Coating thickness is measured with a gauge on the part, and the result should be compared with the class specified on the drawing rather than with a general expectation. Where the part has masked features, their function is verified by assembling the mating components.
Dimensional checks belong on the features where coating growth matters, which usually means a bore that must accept a component or a shaft that must fit into one. Those are the features where an allowance either worked or did not, and checking them at first article catches the problem while the batch can still be adjusted.
6CProto provides quality inspection reports on request and assigns a dedicated project manager to each order, so the acceptance criteria for a coated part can be agreed with the finishing specification rather than after delivery. The test methods that support those checks are published by ASTM committee B08, with surface preparation practice described in ASTM D3359, and any process waste from the finishing line handled under the framework published by the US Environmental Protection Agency.
Specifying anodizing on the next order
An anodizing specification works when it states four things: the type and class, the colour with a reference, the features that must be masked or left with an allowance, and how the result will be inspected. Everything else follows from those decisions, and each of them is cheaper to make before the parts are processed than after.
The two habits that prevent most problems are worth repeating. Approve a reference part before a production batch runs, since colour is judged by comparison rather than by description. And identify the features that coating growth will affect, because a bore that no longer accepts its component is the most common and most avoidable failure in anodized parts. The broader finishing routes available alongside anodizing are described on the surface finishing page.
FAQ
How much does anodizing cost?
Cost is driven by handling labour rather than by chemistry. Parts are racked individually, masked features are plugged by hand, and cosmetic inspection takes time, so a part with many protected holes costs more to process than one with none. Colour choice adds a variable: standard dyes run in batches while special colours may require a minimum quantity. Asking for a quote with the masking plan stated produces a comparable number.
Can aluminium be anodized at home?
Small anodizing setups exist for hobby use, but they cannot reproduce the process control that industrial parts require. Coating thickness, dye consistency and sealing all depend on controlled temperature, chemistry and time, and the safety handling of the acids involved is a serious consideration. For a production part, the practical route is a finishing shop with documented process control and a way to verify thickness on the finished component.
What is the 720 rule used for?
It is an industry calculation used to estimate coating growth from current density and time in sulfuric acid anodizing, which is useful for planning a process rather than for specifying a part. What matters on a drawing is the class and the thickness requirement, which the finisher meets by controlling the process. Quoting the rule instead of the requirement does not tell the shop what the part needs.
Can anodized parts be reworked if the colour is wrong?
The coating can be stripped chemically and the part reprocessed, provided enough material remains and the part has not been damaged. Stripping removes the oxide layer, so it changes the dimensions slightly and returns the part to bare aluminium. In practice it is used for colour corrections rather than for parts with tight callouts, and it should be treated as a rework operation with its own dimensional consequences rather than as a simple reset.
If an aluminium part needs a specified anodized finish, send the model with the type and class, the colour reference and the features that must stay bare. 6CProto reviews the part alongside the finishing route and returns a DFM report with the quote, so masking, allowance and acceptance are agreed before processing. Upload the file at the 6CProto quote page or send it to projects@6cproto.com.