

A molded part that should have a smooth, glossy finish arrives with a matte texture that looks different on every face, and the dispute starts: the drawing said “smooth,” the tool was polished to one standard on one face and another on the next, and no one can point to the reference that defines the result. Molded surface texture is a specification problem: the finish is created by the mold surface, and the mold surface is defined by a finish class or a texture number. The SPI and VDI systems are the language for that definition, and specifying the texture on the drawing is what turns a subjective “smooth” into a reproducible requirement.
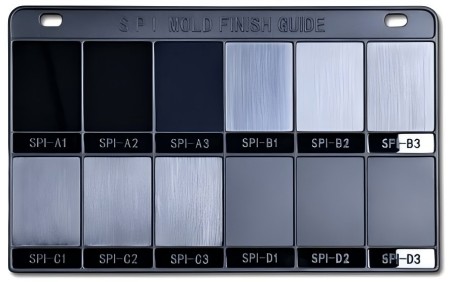
SPI finish classes A–D: what each looks like and costs
The SPI (Society of the Plastics Industry) finish classes describe mold surface finishes for plastics. Class A is a high-polish, mirror-like finish for cosmetic parts; Class B is a fine, medium-polish finish; Class C is a medium-to-dull finish with visible polish lines; and Class D is a dull, sand-blasted or textured finish that hides mold marks. The classes descend in gloss and rise in practicality: A requires the most polishing and the highest tool cost, while D is the most forgiving and the most common for functional or hidden surfaces. The finish class should be chosen by the part’s appearance and function, and the drawing should name the class so the mold builder and the buyer share the reference.
The SPI system is a practical language for plastics, and its classes are often combined with texture numbers for the decorative surface.
VDI texture numbers and how they map to SPI
VDI texture numbers describe the mold’s texture depth, commonly used with spark-eroded or textured mold surfaces. The VDI scale runs from smooth to coarse, and the texture is often specified with a range — for example VDI 24 to VDI 27 for a medium matte — with the actual result confirmed by a texture sample. The VDI number and the SPI class are related but not identical: SPI describes the polish class, while VDI describes the texture depth produced by the mold surface. The specification should use the system that the mold builder and the application understand, and the texture sample is the referee when the number alone is ambiguous.
The mapping between VDI and SPI is approximate and should not be used to convert a critical requirement without a sample; the physical texture plate is the standard.
Specifying texture on the drawing: callouts and sample plates
Put the texture on the drawing with the surface it applies to: “SPI B2 on the front face” or “VDI 24 texture on the grip area” tells the mold builder which surface and which finish. The callout should also note which faces are masked or polished to a different class, because a part with one texture requirement on the front and another on the sides needs both stated. The physical sample plate is the acceptance reference: the mold is textured to match the sample, and the first molded parts are compared to it under defined lighting. A texture callout without a sample leaves the finish open to interpretation; a callout with the sample and the lighting condition is a spec.
The drawing should also state the texture’s functional role — grip, hiding sink marks, or light diffusion — because the function sets the tolerance for the visual match.
Texture, draft, and release: why they must be designed together
Texture and draft interact at the mold. A textured surface increases the friction between the part and the mold, so a textured part needs more draft to release without drag marks or sticking; a deep texture on a vertical wall can require several degrees of extra draft. The texture decision belongs in the part design before the mold is cut, because adding texture to a tool that was polished for zero draft can cause ejection problems. The design should review the textured surfaces against the draft, the ejection, and the material’s shrink, and the tool should be textured with the release in mind. A texture that looks right in the sample but binds in the mold is a texture that fails production.
The texture also affects the part’s wall and gate behavior: a textured cavity can slow the fill and change the flow, and the gate and vent plan should account for the texture depth.
Agreeing on texture acceptance with molded samples
Texture acceptance is settled with molded samples, not with words. The first samples from the textured tool are compared to the reference plate under the agreed lighting, and the gloss, the depth, and the uniformity are judged against the standard. The acceptance should define the limits: how much variation is allowed across the surface, how the sample is viewed, and which defects — witness lines, sink marks, or texture washout at ribs — are acceptable. The sample approval becomes the production reference, and the inspection compares production parts to it. The texture that is approved on the sample is the texture the program has committed to, and the record of the approval prevents the next batch from becoming a new argument.
The molded-texture specification ties together the finish class, the texture number, the draft, and the sample, and it is the difference between a part that looks designed and one that looks finished by accident.
How the texture decision flows through production
The texture decision affects every later step, so it belongs in the design review before the mold is cut. The finish class or texture number sets the mold polishing and texturing work, which sets the tool cost and the lead time; the texture and the draft set the ejection behavior; and the texture affects the fill and the gate plan. A texture added after the tool design is a change that ripples through the tooling, so the part review should confirm the texture with the appearance sample and the function before the mold design is locked. The review should also check the texture against the material: the same mold texture produces a different appearance in different resins, and the gloss and the depth shift with the material and the process. The texture is specified for the production material, not for a generic resin.
Production control of the texture starts with the approved sample. The mold is textured to match the sample, the first parts are compared under the agreed lighting, and the production inspection checks the texture at the interval that catches the drift — mold wear, polish loss, or process variation can change the appearance over the tool’s life. The texture sample and the acceptance record travel with the tool, so a re-polish or a mold repair is matched to the original standard rather than to a memory. When the texture is specified, sampled, and controlled, the molded part’s surface is a designed feature with a reproducible result — and the appearance that the customer approved on the sample is the appearance that ships.
The texture choice also interacts with the part’s defects and its function. A textured surface can hide minor sink marks and flow lines that a glossy surface would expose, which is why texture is sometimes specified on cosmetic surfaces that cannot be made perfectly smooth; but texture cannot fix a structural defect, and hiding a warp or a weakness under texture is a surface solution to a part problem. The function matters as well: a grip texture must provide the friction, a light-diffusing texture must spread the light, and a clean-surface texture must not trap contamination. The texture should be chosen for the function and the defect strategy together, and the review should ask what the texture is hiding and whether the hidden issue needs its own fix.
The texture review should also check the cost, because the finish class is a significant part of the tool cost. A high-polish SPI A surface on a large cavity adds polishing hours; a fine texture on a complex shape adds texturing work; and every cosmetic face that carries a premium class adds to the tool. The design should place the premium finish only where the appearance requires it and let the hidden faces carry a practical class. The texture cost belongs in the tooling review, where the appearance decision is made with its price visible.
Keep the texture reference plates with the tool and the quality record, so the tool can be re-textured or re-polished to the original standard over its life. The plates are the mold’s appearance memory, and the record ties each tool to its approved surface. When the tool is serviced or a mold is replaced, the plates and the record reproduce the approved finish instead of relying on a description.
If you are specifying a molded texture and want the SPI or VDI class, the draft, and the sample plan reviewed before tooling, the 6CProto injection molding team can work from your appearance and function to the texture specification.